11 Mart 2017 Cumartesi

OpenCV C++ Show Webcam Stream on Qt GUI

OpenCV  C++ Show Webcam Stream on Qt GUI

( Qt GUI'de kamera görüntüsünü OpenCV-C++ kullanarak gösterme )


Step 1.  Click “New Project” button on Qt Creator

(Adım 1.  Qt Creator'de “New Project” butonuna tıklayınız) 


Step 2.  Choose “Qt Widgets Application”

(Adım 2.  Proje için “Qt Widgets Application” seçiniz)


Step 3.  Give a name to your project and define location to create your new project

(Adım 3. Projenize isim verin ve kaydedilecek dosyayı belirleyiniz)  


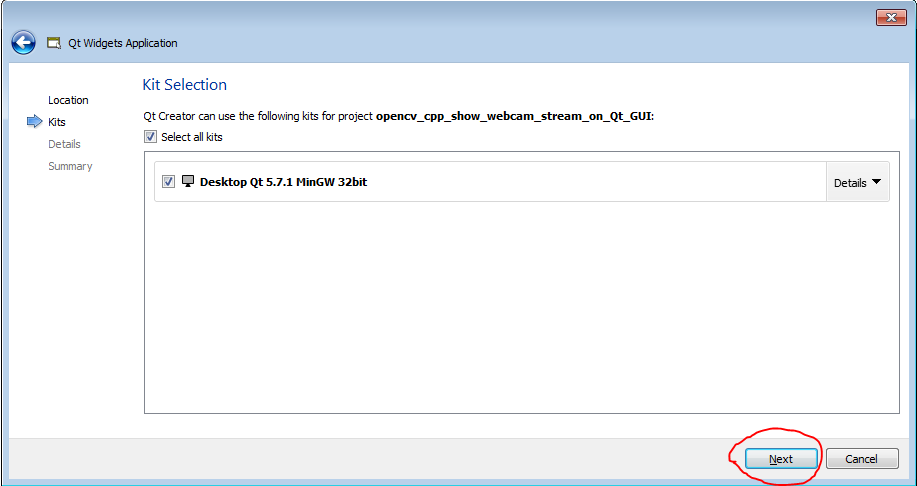
Step 4.  Select “kit” and click “Next” button

(Adım 4.  Derleyici seçiniz ve "Next" butonuna tıklayınız)


Step 5.  Select “QMainWindow” for your project and click “Next”

(Adım 5.  Proje için “QMainWindow” seçiniz ve "Next" butonuna tıklayınız)


Step 6.  “Finish” the creation of your new project

(Adım 6.  Projeyi oluşturmak için "Finish" butonuna tıklayınız)


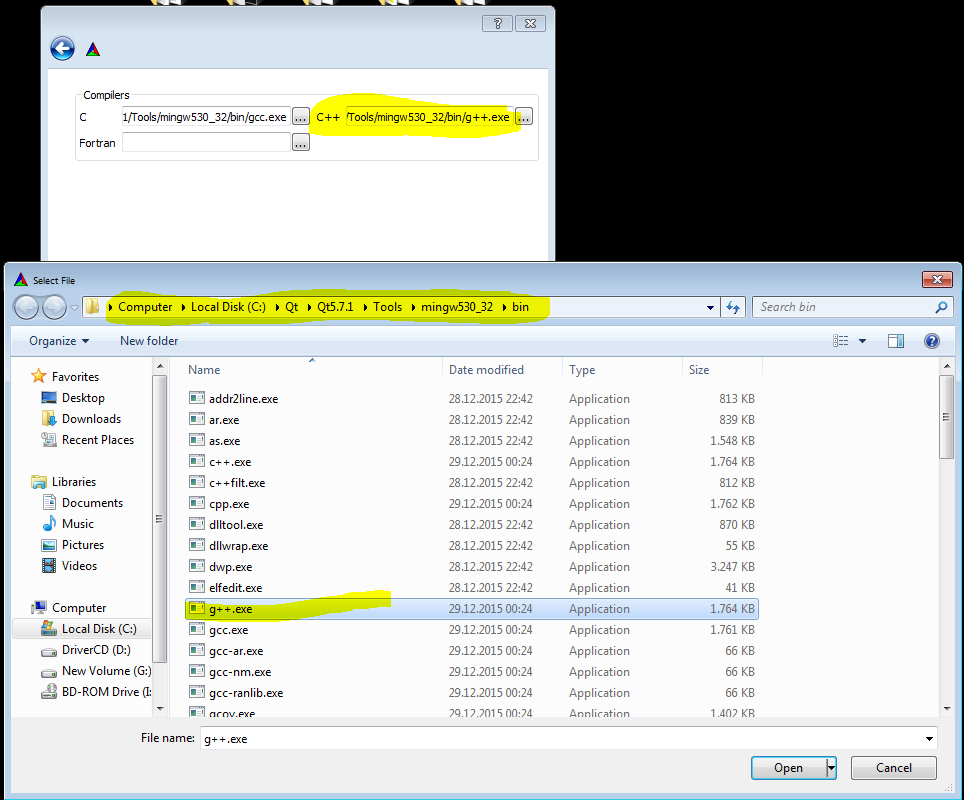
Step 7.  Click “opencv_cpp_show_webcam_stream_on_Qt_GUI.pro” and define your openCV path and libraries.

(Adım 7.   Proje dosyasına “opencv_cpp_show_webcam_stream_on_Qt_GUI.pro” tıklayınız ve OpenCV kütüphanelerinin olduğu yolu tanımlayınız) 


INCLUDEPATH += G:\\opencv\\build\\include \


LIBS += -LG:\\opencv\\build\\bin \
libopencv_calib3d310 \
libopencv_core310 \
libopencv_features2d310 \
libopencv_flann310 \
libopencv_highgui310 \
libopencv_imgcodecs310 \
libopencv_imgproc310 \
libopencv_ml310 \
libopencv_objdetect310 \
libopencv_photo310 \
libopencv_shape310 \
libopencv_stitching310 \
libopencv_superres310 \
libopencv_video310 \
libopencv_videoio310 \
libopencv_videostab310

Step 8.  Click “mainwindow.ui”

(Adım 8.  “mainwindow.ui” arayüz tasarım sayfasını açınız)


Step 9.  Drag and Drop 2 “Push Button”

(Adım 9.  2 tane “Push Button” 'u sürekle-bırakla arayüze ekleyiniz)


Give Object name as “pushButton_open_webcam” and “pushButton_close_webcam”

(Object name olarak “pushButton_open_webcam” ve “pushButton_close_webcam” isimlerini veriniz)

Step 10.  Drag and Drop “Label” to show webcam stream

(Adım 10.  Arayüze kamera görüntüsünü göstermek için "Label" ekleyin)


Step 11.  Click right button of your mouse on the "Open Webcam" button and select “Go to slot” and select “clicked()” signal

(Adım 11.  Farenin sağ tuşuna "Open Webcam" butonu üzerinde basınız ve  “Go to slot” 'u seçiniz ve açılan pencerede “clicked()” sinyalini seçiniz


Do same thing for “Close Webcam” button

(Aynı işlemi "Close Webcam" butonu için de yapınız)

Step 12.  Make following changes to “mainwindow.h”

(Adım 12.  “mainwindow.h” dosyasında aşağıdaki değişiklikleri yapınız)


Step 13.   Make following changes to “mainwindow.cpp”

(Adım 13.  “mainwindow.cpp” dosyasında aşağıdaki değişiklikleri yapınız)


Step 14.  Your application is ready

(Adım 14.  Uygulamanız hazır)


10 Mart 2017 Cuma

OpenCV Installation on Windows and Integration with Qt

OpenCV Installation on Windows and Integration with Qt


(OpenCV'nin Windows'a Kurulumu ve Qt ile entegre edilmesi)


Step 1: Download latest version of OpenCV (OpenCV 3.1 is downloaded for this installation)

Adım 1: OpenCV'nin son versiyonu sitesinden indirilir (bu kurulum için OpenCV 3.1 versiyonu indirildi)


Step 2: Double click to a downloaded "opencv-3.1.0.exe". Extract "build" and "sources" folders to a pre-defined location.

Adım 2: İndirilen "opencv-3.1.0.exe" programına çift tıklanır. "build" ve "sources" klasörleri tanımlanan yere çıkarılır.


Step 3: Download Qt version which includes MinGW. Check my blog post for Qt installation on Windows for OpenCV.

Adım 3: Qt'nin MinGW içeren versiyonu indirilir. OpenCV için Windows'a Qt kurulumu için blog yazımı kontrol edebilirsiniz


Step 4: Download Cmake and extract to C: folder

Adım 4: Cmake indirilir, C: klasörüne çıkarılır


Step 5: Start > Computer > Right click > Properties

Adım 5: Başlat > Bilgisayar > Sağ tıkla > Özellikler


Step 6: Advanced system settings > Environment variables > System variables > Path > Edit

Adım 6: Gelişmiş sistem ayarları > Ortam değişkenleri > Sistem değişkenleri > Path > Düzenle


Step 7: Add Cmake and MinGW which is located in Qt path to a Environment variable

Adım 7: Cmake ve QT içerisinde yer alan MinGW yolları path’e eklenir.

C:\Qt\Qt5.7.1\Tools\mingw530_32\bin;
C:\Qt\Qt5.7.1\5.7\mingw53_32\bin;
C:\cmake-3.7.2-win64-x64\bin;


Step 8: Open Cmake GUI

Adım 8: Cmake arayüzü açılır


Step 9: Add "opencv / sources" and "opencv / build" and click "configure" button

Adım 9: opencv 'nin sources ve build klasörleri eklenir ve "configure" tuşuna basılır


Step 10: Specify native compilers and select "gcc.exe" and "g++.exe" which is located in Qt folder

Adım 10: Yerel derleyiciler seçilir ve sonra Qt klasörü içerisinde yer alan "gcc.exe" ve "g++" seçilir


Step 11: Add "WITH_QT" and "WITH_OPENGL" to configuration

Adım 11: "WITH_QT" ve "WITH_OPENGL" konfigürasyona eklenir.


Step 12: Click "Generate" button

Adım 12: "Generate" butonuna basılır


Step 13: Open "cmd" and go to opencv folder and write "mingw32-make" command. You can write this command "mingw32-make -j4" for fast installation. "-j4" means that use 4 core for installation. You can adjust this number. After finished it run "mingw32-make install" command.

Adım 13: "cmd" açılır, opencv klasörünün yer aldığı dizine gidilir ve "mingw32-make" komutu yazılır. Bu komutu hızlı kurulum için "mingw32-make -j4" formatında da yazabilirsiniz. Burada "-j4" ifadesiyle kurulum esnasında bilgisayarın 4 çekirdeğinin de kullanılması gerektiği belirtilir. Daha sonra "mingw32-make install" komutu çalıştırılır.


Step 14: Open Qt and then open project file (.pro) and add openCV libraries. You should define the path of folder which includes 'opencv' and 'opencv2' folders. They may be located under "build/include/" or "build/install/include/" folder.

Adım 14: Qt açılır sonra proje dosyası açılır ve openCV kütüphaneleri eklenir. Burada kurulumun yapıldığı build klasöründe include klasörü içerisinde yer alan 'opencv' ve 'opencv2' klasörleri var ise kurulum başarılıdır. Bazen bu 2 klasör build/install/include klasörü içerisinde yer almaktadır. Önemli olan bu klasörlerin bulunduğu yolu tanımlamanızdır.


INCLUDEPATH += G:\\opencv-3.1.0\\build\\install\\
LIBS += -LG:\\opencv-3.1.0\\build\\bin \
libopencv_calib3d310 \
libopencv_core310 \
libopencv_features2d310 \
libopencv_flann310 \
libopencv_highgui310 \
libopencv_imgcodecs310 \
libopencv_imgproc310 \
libopencv_ml310 \
libopencv_objdetect310 \
libopencv_photo310 \
libopencv_shape310 \
libopencv_stitching310 \
libopencv_superres310 \
libopencv_video310 \
libopencv_videoio310 \
libopencv_videostab310 \

Note: Adding each library and their path to Qt's project file (.pro) may be boring. You can write Opencv libraries and their path to a text file like "opencv_library_path.txt" and then you can add this file to a project file. When you save project file, you see this file be added your project.

Not: Her proje için proje dosyasına (.pro) kütüphaneleri bu şekilde eklemek size zahmetli bir iş olarak gelmiş olabilir. Bu kütüphane isimlerini ve yolunu istediğiniz bir konumda oluşturduğunuz text dosyasına (.txt uzantılı) yazınız ve bu dosyaya "opencv_library_path.txt" ismini verebilirsiniz. Qt proje dosyasına sadece bu dosyanın yolunu aşağıdaki gibi tanımlayabilirsiniz. Bu şekilde her projeye sadece bu tek satır kodu ekleyerek openCV kütüphanelerini projenizde kullanabilirsiniz. Proje dosyanızı kaydettiğinizde bu dosyanın projenize eklendiğini göreceksiniz.

include (H:\opencv_library_path.txt)


OpenCV installation on Windows and integration with Qt has been done.

OpenCV'nin Windows'a kurulumu ve Qt ile integrasyonu tamamlandı